Editor’s Comments. I’d like to thank Patrick for submitting this how-to post. This is a fun little project with a very functional result. Patrick’s suggested “5-gram Tyvek Wallet” as a name, but in honor of his creativity I give you the Basso Bifold Wallet…

A finished Basso Bifold Wallet
Project Objective
To create a low-profile, ultralight, waterproof, and tear resistant wallet that can hold four essential items:
- Drivers License
- Credit Card
- ATM Card
- $50+ cash: 2 x $5, 2 x $10, 1 x $20
The design must adequately protect the cards/ID and prevent items from falling out.
Features
- One main pocket for paper currency
- Two smaller pockets for cards
Assembly materials & tools
- FedEx Large Pak Envelope made of Tyvek, ideally used and recycled
- 15-inch ruler
- Pencil with a sharp point
- Scissors
- Small Bottle Contact Cement (optional but recommended)
Step-by-step Instructions
1. Start with a used FedEx Express Large Pak Envelope face down. You should see a small FedEx logo and “Extremely Urgent” in the upper left quadrant.
2. MEASURE: across the top and bottom of the envelope
- 3 inches from the right
- 12.5 inches from the right
3. DRAW: a straight vertical line from the top 3-inch mark to the bottom 3-inch mark and do the same for the 12.5-inch marks.

4. CUT: along the…
- 3-inch vertical line, cutting through both pieces of Tyvek
- 12.5-inch vertical line, also through both pieces of Tyvek
Discard scrap edge pieces.
5. FLIP: the envelope over, so that you see Large Pak in the upper right quadrant.
6. MEASURE: in 2 inches from the…
- Top left edge
- Top right edge
7. MEASURE: in 2 inches from the…
- Bottom left edge
- Bottom right edge
8. DRAW: a horizontal line between the left 2-inch marks.
9. DRAW: a horizontal line between the right 2-inch marks

10. CUT: only the upper/top layer of Tyvek along both the left and right 2-inch lines. Discard center cut section.
11. FOLD: the newly created 2-inch flaps in half, and then impress the crease with a plastic card or ID.
12. FLIP: the envelope such that “FedEx Express / Extremely Urgent” is in the upper left quadrant.
13. MEASURE: across the top and bottom of the envelope, starting from the right side, at…
- .5 inches
- 3.5 inches
- 6.5 inches
- 9.5 inches
NOTE: I used a red marker to show where measurements will be laid out but you need not repeat this process. You just need a small mark for each of the measurements.

14. FOLD AND CREASE: at the .5-inch mark, using the ruler for straight edge
15. FOLD AND CREASE: at the 3.5-inch mark
16. FOLD AND CREASE: at the 6.5-inch mark
17. FOLD AND CREASE: at the 9.5-inch mark
18. FOLD: the envelope in half, top to bottom, using the envelope’s taped seam as your guide.
19. UNFOLD: the envelope so that “FedEx Express / Extremely Urgent” is in the upper left quadrant.
20. MEASURE: 3.5 inches up and down from center line on the left hand side
21. MEASURE: 3.5 inches up and down from center line on the right hand side
22. FOLD: along the upper 3.5-inch marks
23. FOLD: along the lower 3.5-inch marks
NOTE: The fold we have been creating will be used to aid the next set of cuts.

24. CUT: down to the 3-inch vertical fold on both the top and bottom, following the newly created folds along the 3.5-inch lines.
25. MEASURE: across 2.5 inches from the top and bottom cut, starting from the left side measurement, based on the last two cuts.
26. DRAW: a line between the two newly created marks.
NOTE: This will leave a half-inch flap that will be used to create a folded edge on the bill pocket section and strengthen the wallet.
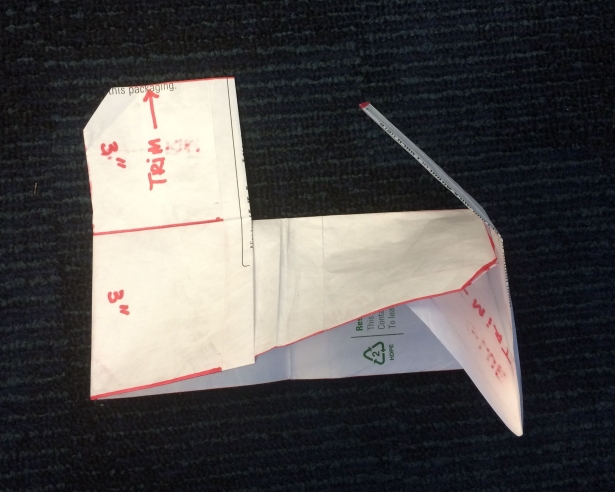
27. CUT: along the 2.5-inch line. The end result is shown below, with the envelope rotated a quarter turn to the right

NOTE: We are now working in the bottom left and bottom right corner

28. CUT AND REMOVE: the bottom left and right corner, following folds again. The fold lines will align to 3.5 inches from the bottom, and about 4 inches from the left and right.
NOTE: We are now working in the bottom left and bottom right corner.


29. CUT AND REMOVE: the upper left and upper right corners, following folds again. The cut line will align to 3 inches from the top, and about 1 inch from the left and right.

30. CUT: CUT AND REMOVE: the upper left and upper right corners, following folds again. The cut line will align to 3 inches from the top, and about 1 inch from the left and right.

31. GLUE AND ADHERE: the flaps identified using flexible contact cement. This is recommended but not required.

32. TRIM: about one-eighth of an inch, according to the diagram below, to make everything fit better during final assembly.


33. ROTATE: the envelope with two cut-out corners at the top.
34. FOLD DOWN: the half-inch flap. Glue it later — adjustments may need to be made during final assembly.


35. CUT: a half-inch from the corners. This will help with final assembly. These two photos show before and after this cut:


36. TRIM: about one-eighth of an inch to aid in final assembly.


37. FLIP: up and across such that FedEx logo is in the upper right quadrant of the envelope.
38. TRIM: off about .25 inches from the the top of each upper tab.


39. FLIP: the envelope over again.
40. CUT: a triangular .5-inch wedge from the inner corners as shown.

Final Assembly
41. FOLD: in half, bottom to top

42. FOLD: middle notched flap, down from the top

NOTE: Please refer to the following pictures for hints on this process:
43. ASSEMBLE: the credit card pocket, starting on the left side.
44. FOLD: the left hand side to the right.
45. TUCK: the notched center fold inside pocket.


46. REPEAT: the process on the right hand side.
47. TRIMMING MAY BE REQUIRED: These flaps are used to lock down the card pocket when they are tucked inside the bill section of the wallet. This trimming removes extra material that will interfere with the credit card pocket alignment.

48. TUCK: the fold into the bill area of the wallet and push the flap down flat in each corner.


Project completed!

Enjoy your new wallet.
If you have any comments on the design instructions, please post, thanks!
Tags:
Andrew, im an employee of FedEx and are you aware that you cannot use the package for anything other than the purposes of shipping? I suggest you remove this post or do this all over again the right way and purchase sheets of Tyvek. Those envelopes cost our company thousands and thousands of dollars, please do the right thing.
This is a fun project for a *used* envelope. How is this supposedly costing fedex anything? Ever heard of recycle and reuse?
Reusing Fedex envelope is old hat for people who don’t want to buy large rolls of Tyvek.
Not sure why someone would be offended when it’s common knowledge in the backpacking community for years.
Plus, most of the offices I have been to will refuse to give packing supplies to customers unless they already pad for the shipping. So, I am not sure how this is abuse of the company’s resource seeing one can’t simply pick up brand new ones without jumping through a few hoops.
Wow, get over yourself FedEx guy! You are drinking the coolaid too much over there apparently. There’s nothing illegal about using FexEx packaging for ANYTHING like this. It’s dorks like yourself that are on their high horse just making stuff up to try to validate to yourself how important you think you are. Now go back to shuffling boxes around and step on it little fella!
Jason – did you even see that he wrote “FedEx Large Pak Envelope made of Tyvek, ideally used and recycled”?
Jason…Andrew suggested that you use a recycled envelope at the beginning of the directions. Great post and a very creative use of a used envelope.
That is very interesting, that the reuse of mailing/shipping containers is not authorized…
I wonder if “cannot use” as mentioned in the previous post means illegal?
is it specific to tyvek envelopes or all types of shipping materials?
Is there a specific federal law that states the aforementioned post from “Jason”? or is it more
that FDX doesn’t like when people use their free envelopes for other than shipping
purposes.
Very interesting…
I just don’t want to get arrested if I use a piece of tyvek to make one of these very cool wallets.
No comment on recycling used Tyvek mailers, but…48 separate assembly steps seems excessive. If I’m going to work that hard it better look like a whooping crane when I’m done!
😉
When I came up with this project to create a Tyvek wallet, I was sitting at my desk looking at a used envelope and got a wild idea to try an origami style project that was mostly folded and did not need any glue or sewing to hold it together. I did start with a simpler set of instructions but decided to add the extra timing steps to allow the wallet to fold together more smoothly for a cleaner finished project.
FYI: It takes me about 15 – 20 minutes to make a wallet now – but took me 35 to 40 minutes the first time.
Hmm…. for my next project I will try to get it to also transform into a crane. ;>)
The fifth essential item that was left off the list is your healthcare card / ID. 🙂 I agree, 48 steps is excessive, but I like the idea of using this material for a lightweight backpacking wallet. Will be experimenting with a 6-step version the next time I get a FEDEX envelope.
It seems the initial cuts are wrong. Large pak envelopes are 12″x15.5″. If you cut 3″ and 12.5″ from the right there’s no way to get the needed columns in step 13.
Based on the first cuts: 12.5-3=9.5″
The columns in step 13: 3+3+3+3+.5=12.5″
I’m guessing you meant 15.5 from the right on that first step(or 12.5 from the 3″ mark).
Brendan – you are correct I meant to say 15.5 from the right edge — oops. I will change the post to reflect the correct measurement
This is pretty cool. My current wallet is made out of gorilla tape and tin foil, so it blocks the RFID too:).
Best,
Simon